Android Service – Types and lifecycle | Bound and Unbound Service

Android Service is a component which doesn’t have any UI and it runs in the background.

It can update UI elements (UI elements of the application which is currently using the service).

Services allow sharing functionality among applications without creating a physical copy of the class.

There are two types of Android Service

Bound Android Service

The Android service which works for specific activity or application is called bound services.

Unbound Android Service

The Android service which is continuously running or system provided services are called unbound services.

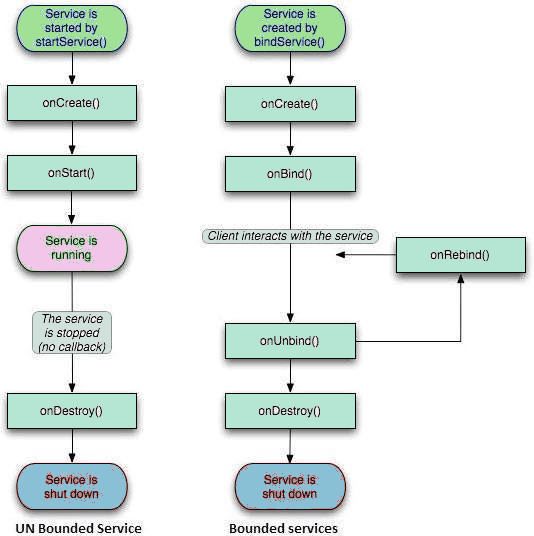
The methods in the lifecycle of Bound and Unbound Services are as follows:

Bound Services

  1. onCreate()
  2. onBind()
  3. onUnbind()
  4. onDestroy()

Unbound Services

  1. onCreate()
  2. onStartCommand()
  3. onDestroy()


The figure below explains the lifecycle of Bound and Unbound Android Service.

Android Service

Let’s know about these methods and how they are utilized in android development.

onStartCommand()

The system calls this method when another component, such as an activity, requests that the service is started, by calling startService().

Once this method executes, the service is started and can run in the background indefinitely.

If you implement this, it is your responsibility to stop the service when its work is done, by calling stopSelf() or stopService().

onBind()

The system calls this method when another component wants to bind with the service by calling bindService().

onUnbind()

The system calls this method when all the clients are disconnected from a particular interface that is given by the service.

onCreate()

The system calls this method when the service is created the first time, It uses onStartCommand() or onBind().

onDestroy()

The system calls this method when the service is no longer used and is being destroyed. This is the last call the service receives.

Declare the service in AndroidManifest.XML file 

<manifest ... >
  ...
  <application ... >
      <service android:name=".MyService" />
      ...
  </application>
</manifest>

Create Android Service in Application

It is very simple to create our own service, in the following code we will see how to create the service class with its methods.

public class MyService extends Service{
 int mStartMode;// indicates how to behave if the service is killed
 IBinder mBinder;      // interface for clients that bind
 boolean mAllowRebind; // indicates whether onRebind should be used
    @Override
    public void onCreate() {
        // The service is being created
    }
    @Override
    public int onStartCommand(Intent intent, int flags, int startId) {
        // The service is starting, due to a call to startService()
        return mStartMode;
    }
    @Override
    public IBinder onBind(Intent intent) {
        // A client is binding to the service with bindService()
        return mBinder;
    }
    @Override
    public boolean onUnbind(Intent intent) {
        // All clients have unbound with unbindService()
        return mAllowRebind;
    }
    
    @Override
    public void onRebind(Intent intent) {
        // A client is binding to the service with bindService(),
        // after onUnbind() has already been called
    }
    @Override
    public void onDestroy() {
        // The service is no longer used and is being destroyed
    }
} 


Android Activity – Activity Lifecycle | Android ActivityManager

Android Activity is one of the components of Android. It represents a single screen in your application.  We can say that it performs actions on the screen.

An application can have zero or more activities. Typically, applications have one or more activities.

The main aim of Activity is to interact with the user. From the moment an activity appears on the screen till the time it is hidden.

Each activity can then start another activity in order to perform different actions. Each time a new activity starts, the previous activity is stopped, but the system preserves the activity in a stack (the “back stack”).

Each time a new activity starts, the previous activity is stopped. However, the system preserves the activity in a stack (the “back stack”).

Android activity goes through a number of stages, known as an activity’s lifecycle.

There are 7 stages in Android Activity lifecycle. ActivityManager manages these activities and shows what state your activity is.

7 methods of Android Activity Lifecycle

  1. onCreate()
  2. onStart()
  3. onResume()
  4. onPause()
  5. onStop()
  6. onDestroy()
  7. onRestart()


The Activity can be destroyed from onStop() or onRestart() methods, let us understand the functions of each of these methods below:

Created

In this method, activity should create its UI.

Started

In this state activity is about to start, it is completely invisible.

Resumed

In this state Activity’s UI is completely visible on the screen.

Paused

Activity is about to unload or cover because of another activity, in this state activity is completely visible on the screen.

Stopped

Activity is unloaded or another activity has fully covered the first activity, in this state activity is completely visible.

Destroyed

In this state, activity is already unloaded and about to get destroyed.

Restarted

In this state, activity is about to restart because of uncovering.

The following figure explains the Activity Life Cycle:

Android Activity
Activity Lifecycle

Declare the Activity in AndroidManifest.XML file with intent filters:

<activity
android:name=".MainActivity"
android:label="@string/app_name" >
  <intent-filter>
<action android:name="android.intent.action.MAIN" />
<category android:name="android.intent.category.LAUNCHER" />
  </intent-filter>
</activity>

The <action> element shows that this is the “main” entry point to the application and The <category> element allow users to launch this activity.

The best way to understand the various stages experienced by an activity is to create a new application and implement the various events.

After creating the application, inside our MainActivity we have to implement all the methods one by one and we can see all the events very well with the help of LogCat.

public class MainActivity extends Activity {
    @Override
    protected void onCreate(Bundle savedInstanceState) {
        super.onCreate(savedInstanceState);
        setContentView(R.layout.activity_main);
     // The activity is being created.
    }
    @Override
    protected void onStart() {
        super.onStart();
        // The activity is about to become visible.
    }
    @Override
    protected void onResume() {
        super.onResume();
        // The activity has become visible (it is now "resumed").
    }
    @Override
    protected void onPause() {
        super.onPause();
        // Another activity is taking focus (this activity is about to be      "paused").
    }
    @Override
    protected void onStop() {
        super.onStop();
        // The activity is no longer visible (it is now "stopped")
    }
    @Override
    protected void onDestroy() {
        super.onDestroy();
        // The activity is about to be destroyed.
  }
}

First Android App – Create your first Android Application

Hello World! – First Android App

This tutorial will guide you in creating a very simple first Android app.

It is very easy to build the Application in Android. We had learned in our old tutorials about the basic concepts.

So it’s time to do some coding and create the Hello World Example in Android.

Requirements for creating first android app

Here, we use the Eclipse IDE. Update the SDK tools in SDK manager if not with the latest Android version.

Example with code:

Create an Application by following the steps:

Click on File->New->Android Application Project->HelloWorldExample.

See the figure below for creating a new application:

First Android App development setup
First Android App development Setup

 Provide some name of the application, the package name is created by default. If you want you can change the package name.

After providing the details in above screen, press Next and create an Activity as shown in the figure below:

First Android App Development Step by Step
First Android App Development

Here, you can choose anyone. However, for a single Activity, it will choose the first option by default i.e. BlankActivity. Press Next and then you will see the step shown in the figure below:

Android App Development setup
First Android App Development

It shows the name of our Activity, i.e MainActivity, and its layout file. We can change the name of both if want.

Now, after pressing Next it creates the application in your workspace. This can take few minutes (especially if this is the first project you created).

Let’s see and understand some of these files, i.e. MainActivity.java, activity_main.xml and AndroidManifest.xml file.

activity.main.xml

<RelativeLayout xmlns:android="http://schemas.android.com/apk/res/android"
xmlns:tools="http://schemas.android.com/tools"
android:layout_width="match_parent"
android:layout_height="match_parent"
tools:context="com.example.helloworldexample.MainActivity" >

<TextView
android:layout_width="wrap_content"
android:layout_height="wrap_content"
android:text="@string/hello_world" />

</RelativeLayout>

This XML file is our Main layout file which shows the view on the screen. Here, it contains a TextView with some text inside the RelativeLayout element.

MainActivity.java

This is our MainActivity which sets the view inside onCreate() method.

public class MainActivity extends ActionBarActivity {

@Override
protected void onCreate(Bundle savedInstanceState) {
super.onCreate(savedInstanceState);
setContentView(R.layout.activity_main);
}
}

Here, we can see very well it takes the reference of our layout. We can add various widgets to show on the screen, just take the reference of all of them in our Activity.

By default, this application set the intent-filter for our MainActivity in AndroidManifest.xml file.

AndroidManifest.xml

<?xml version="1.0" encoding="utf-8"?>
<manifest xmlns:android="http://schemas.android.com/apk/res/android"
package="com.example.helloworldexample"
android:versionCode="1"
android:versionName="1.0" >

<uses-sdk
android:minSdkVersion="8"
android:targetSdkVersion="21" />

<application
android:allowBackup="true"
android:icon="@drawable/ic_launcher"
android:label="@string/app_name"
android:theme="@style/AppTheme" >
<activity
android:name=".MainActivity"
android:label="@string/app_name" >
<intent-filter>
<action android:name="android.intent.action.MAIN" />

<category android:name="android.intent.category.LAUNCHER" />
</intent-filter>
</activity>
</application>

</manifest>

Here, you can see the version name, code, app name etc. and our MainActivity is registered by default with action and the category tag.

strings.xml

<string name="app_name">HelloWorldExample</string>
<string name="hello_world">Hello world!</string>
<string name="action_settings">Settings</string>

This is our strings file in values folder. Here, we can create the strings and fetch in our whole application.

This is your auto-generated app and now you can compile and run the app from IDE.

Output

Following is the output of our application. You can see it shows a text “Hello World” on screen.

First Android App development exmple
Output

So, this is all about the simple auto-generated application of Android. In future posts, we will learn more about custom apps.

Eclipse Android – Android Project Structure Eclipse IDE

Before building an application in Android, we need to know eclipse android project structure and some basic concepts of project folders which are the key building blocks of an Android application.

Let us take an example which contains the project name, its directories and sub-directories.

In Eclipse IDE, you can see the following structure very well. We will explain only important project folders here.

MyApplication/

src
gen
Android X
Android Dependencies
assets
bin
libs
res/

drawable
layout
menu
values
anim
raw

AndroidManifest.xml
progaurd-project.txt
project.properties

Let’s understand the above eclipse android project directories one by one.

src

It contains java source files.

gen

It contains automated generated files. Like R.java

Android X

Here X is the version, It contains JAR files having required classes for target platform (build SDK).

Android Dependencies

It contains a JAR file having required classes for Compatibility purpose (Minimum Required SDK).

assets

It contains binary files like video or audio files.

bin

It contains compiled version of Application in “.apk” format (android package or application pakage).

libs

It contains external library files in form of .jar.

res

This is s directory which contain all the resource files. Let’s see the sub-directories inside this.

drawable

It contains drawable files like images.

layout

This is our layout files which contain all the XML files. It creates our apps UI.

menu

It contains XML files which create option menu.

values

It contains XML files for Localisation, Styles etc.

anim

It contains XML files which create Animation.

raw

It contains the Arbitrary files to save in the raw form.

AndroidManifest.xml

It stores configuration about an Application like the number of activities, permissions, external libraries, package name, version information etc.

progaurd-project.txt

This file is used to make decompilation difficult.

project.properties

It stores information about Target.

So, this is all about the eclipse android project structure which is in form of directories and sub-directories.

We can organize it by defining the colors, images and other resources.

Android Components – Android development tutorial

Android components can be mainly categorized in 4 components.

  1. Activity
  2. Service
  3. Content Provider
  4. Broadcast Receiver.

We have to understand all the above basic components in order to build an Android application.

Some other fundamental components are View, Intent, Fragment, AndroidManifest.xml etc.

Let’s see the short description of every component one by one.

Activity

An Activity is a User Interface(UI) Android component that usually represents a single screen in your application.  We can say that it performs actions on the screen.

An application can have zero or more activities. Typically, applications have one or more activities.

The main aim of Activity is to interact with the user. From the moment an activity appears on the screen till the time it’s hidden, it goes through a number of stages, known as an activity’s lifecycle. We will

We will discuss Activity Life Cycle later.

We can create our Activity subclass by extends with Activity.

public class MainActivity extends Activity {

}

Service

Service is an Android component which doesn’t have any UI, it runs in the background. It can update UI elements.

It allows sharing functionality among application without creating the physical copy of the class.

Services are of two types:

  • Bound
  • Unbound.

We can create our Service subclass by extends with Service.

public class DemoService extends Service {

}

Content Provider

The Content Provider android component provides following features:

  1. Hides database details (database name, table name, column information etc.)
  2. Allows the application to share data among multiple applications.

In Android, it is embedded with SQLite Database where all our data gets stored.

To create the content provider subclass, extend the ContentProvider class.

public class DemoContentProvider extends ContentProvider {

        public void onCreate(){}

}

BroadCast Receiver

Broadcast Receiver android component is used to receive broadcasted messages sent by the system or other applications.

It allows us to register for system and application events. When the event is started then all the registered receivers are notified by the

The implementing class for a Recer extends the BroadCastReceiver class.

public class DemoReceiver extends BroadCastReceiver 
{ 
public void onReceive(context,intent){}
}