Testing Live streaming or multimedia applications require proper lab setup which includes a bandwidth controller, network sniffing tools like Wireshark, Fiddler; application debug tools like ADB and MONITOR for Android-based applications, iTools, iTunes and xCode for iOS based applications, physical devices to test the application and the internet with the required bandwidth.
Testing Approach
1. Functional Testing
We should first test the functionality of the application. Below points should be tested with respect to Player.
- Ability to Launch the application
- Ability to play/pause the video stream
- Ability to increase/decrease the volume
- Ability to see Closed Captions if implemented
- Ability to forward/rewind the stream
2. Testing Video Stream
Streaming testing should be done to check the Bitrate, Buffer length, and Lag in video playback. One should test below-mentioned points in video streaming:
- How much time it takes to start the playback
- Lag in the video from Live content
- What is the buffer fill
- Able to playback the stream at variable bandwidth if that is implemented
3. AV Sync
Audio Video Sync or Lip Sync refers to the timing sync between audio part (sound) and video part (images) during playback. It must be tested to deliver the quality streaming application. When we talk about a streaming application and video playback, AV Sync comes into the picture.
You can test AV Sync simply by watching and observing the video playback, or you can use AV test videos. There are several AV-Test videos available on the internet to use. However, you can not find exact AV Syncout conditions by observing. To find exact issues you need to test your video from available stream analyzers.
4. Closed Captions(CC)
Closed Captions or CC are the subtitles you see during playback of a video. These need to be tested if they are implemented in your stream. To test this functionality, you need to verify that the CC is in sync with the Audio
5. Profile Switching
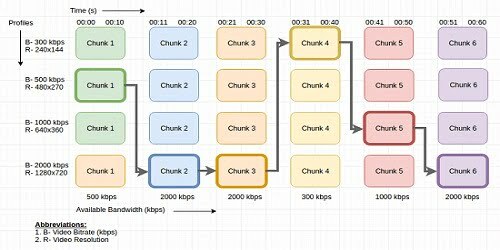
This is the main part to test if your stream supports Adaptive Bitrate. To test this, you will require a bandwidth controller that is capable of controlling your network bandwidth as required. A network sniffing tool to check the switching of profiles. Debugging tools to capture any error situation.
Below is an illustration of how Adaptive Bitrate works in the variable bandwidth conditions. Suppose when your player started the playback it is getting a bandwidth of 500 kbps, so it started the playback of the first chunk of (B-500kbps R-480×270) stream.
Then suddenly your bandwidth increases to 2000 kbps, then the player switched the stream to the second chunk of (B-2000 R- 1280×720) stream. The bandwidth does not change from 2000 kbps for the third chunk, so the player plays the third chunk of (B-2000 R- 1280×720) stream.
Again your bandwidth decreases to 300 kbps; then the player switched the stream to the fourth chunk of (B-300 R- 240×144) stream.
This goes on in the same manner. The stream gets switched to the profiles as per available bandwidth.
[image_frame url=”http://rcvacademy.com/wp-content/uploads/2016/10/http-live-streaming-adaptive-bitrate.png” border_style=”boxed-frame” action=”open-lightbox”]
